# Eclipse: How to Create and Export JAR Files
In Java development, a **JAR (Java Archive)** file is a package file format used to aggregate many Java class files, associated metadata, and resources (text, images, etc.) into a single file for distribution.
This comprehensive guide walks you through the process of exporting your Java projects as JAR files using the Eclipse IDE.
---
## 1. Opening the JAR Export Wizard
The Eclipse IDE provides a built-in **JAR Export Wizard** that makes it easy to package your projects. You can export your project as a standard library JAR or as a runnable JAR.
### Steps to Open the Wizard:
1. In the **Package Explorer** view, select the project or specific files/folders you want to export. If you want to package the entire project, simply click on the project root folder.
2. Click on the **File** menu in the top menu bar and select **Export...** (or right-click the project and select **Export...**).
3. In the wizard selection dialog, type **"JAR"** in the filter text box to quickly locate the options.

4. Under the **Java** folder, select **JAR file** (for library packages) or **Runnable JAR file** (for executable applications).
5. Click the **Next** button to proceed.
---
## 2. Configuring the JAR File Settings
Once the wizard is open, you will be presented with the **JAR File Specification** page. Here, you can customize what goes into your archive and where it will be saved.
### Key Configurations:
* **Select the resources to export:** Check or uncheck the projects, packages, or individual files you want to include in the JAR.
* **Export class files and resources:** (Default) This exports compiled `.class` files and project resources (like `.properties` or configuration files) making the JAR ready for production use.
* **Export Java source files and resources:** Check this option if you want to include your `.java` source code inside the JAR (useful for sharing open-source libraries with other developers).
* **Select the export destination:** Click the **Browse...** button to choose the destination directory and define the name of your JAR file (e.g., `MyApplication.jar`).
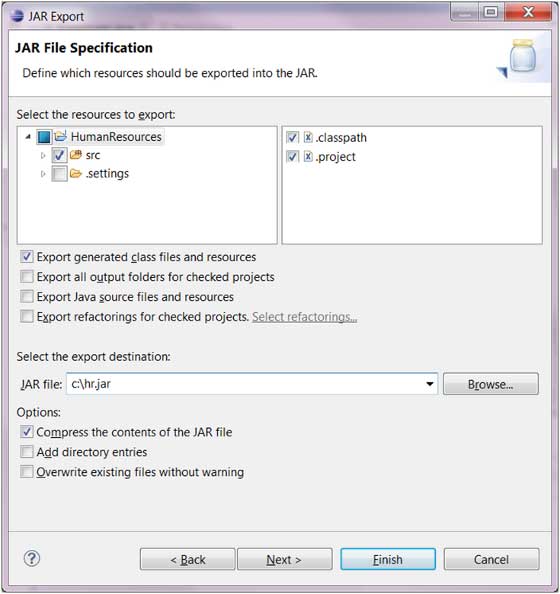
### Finalizing the Export:
1. Click **Next** to configure advanced JAR packaging options (such as sealing the JAR or compressing the contents).
2. Click **Next** again to configure the **JAR Manifest** (where you can define the `Main-class` if you are creating an executable JAR manually).
3. Click **Finish** to generate the JAR file.
---
## 3. Standard JAR vs. Runnable JAR
Depending on your project requirements, you will need to choose between two types of JAR files:
| JAR Type | Use Case | Key Requirement | How to Run |
| :--- | :--- | :--- | :--- |
| **Standard JAR** | Used as a dependency/library in other Java projects. | No `main` method required. | Added to the build path of another project. |
| **Runnable JAR** | Used as a standalone executable application. | Requires a class with a `public static void main(String[] args)` method. | Executed via command line: `java -jar filename.jar` or by double-clicking. |
---
## 4. Best Practices & Considerations
* **Build Path Dependencies:** If your project relies on external third-party libraries (e.g., JDBC drivers, Apache Commons), a standard JAR export will **not** bundle these dependencies inside your JAR. To package dependencies together, use the **Runnable JAR file** export option and select the *"Package required libraries into generated JAR"* option.
* **Keep Manifests Updated:** If you are manually maintaining a `MANIFEST.MF` file, ensure that the classpath and main class attributes are correctly defined.
* **Refresh Your Project:** Always perform a clean build (`Project -> Clean...`) before exporting to ensure that all compiled `.class` files are up-to-date.